Daisy Chain Cake
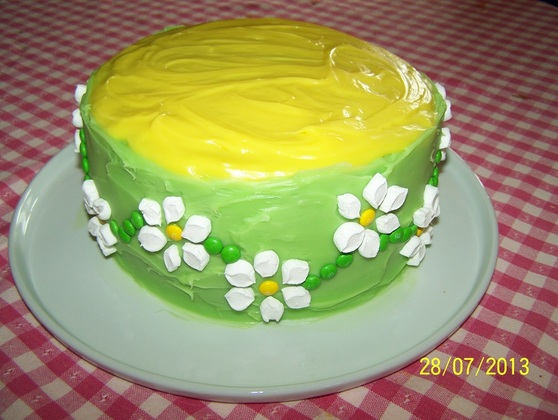
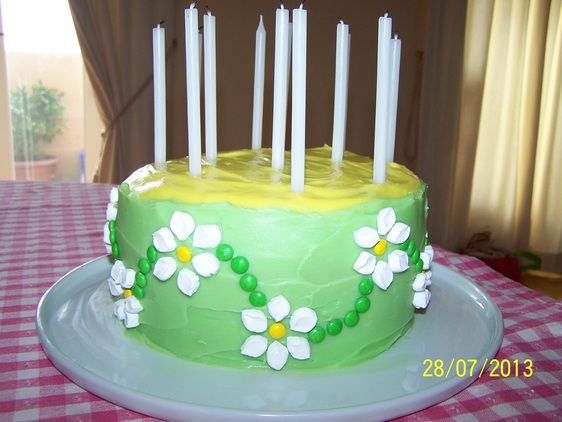
My niece saw this cake in one of my cookbooks and requested it for her birthday this year.
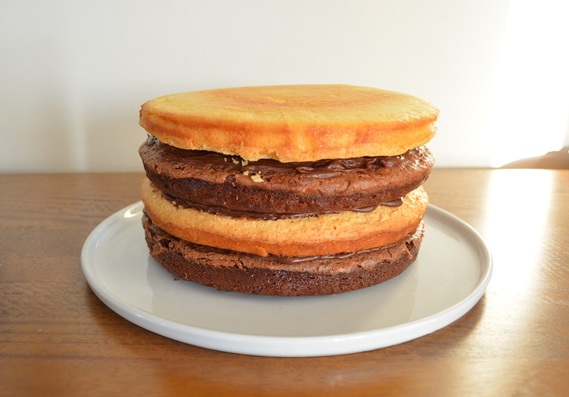
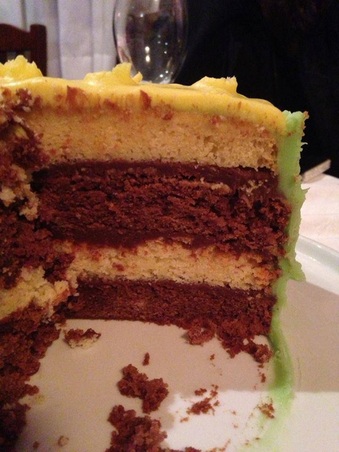
I did not like the cake used in the cookbook, so I used a double decker mud cake that I love instead. And as I do not like butter cream I have used a white chocolate ganache. I mention this as if you like the design (as it is super simple), you can play with the cakes, for instance it can be a carrot cake with a cream cheese icing, as it tints well. There are many combinations you can use, pick your favourite cake and icing (the icing just needs to be white so you can tint it) and have fun.
I also used mini m&m's as I'm not very good at piping. So if you are good at piping straight lines, you can use a darker shade of the green icing and pipe the connecting lines between the flowers.
Also if you want the cake to be taller, bake another cake and add more layers, that is up to you.
The recipe also states more white chocolate ganache than it needs, but this is because once you tint the ganache, you don't want to not have enough, as the next batch you make will never be the same colour, so I would rather have a little extra, than not enough. Plus you can refrigerate leftover ganache and use it up on cupcakes over the next week, then freeze them iced if you like.
This cake is very pretty and made my niece very happy.
Recipe
Recipe adapted from an Australian Women's Weekly Cookbook
Cake x 2
I used a Double Decker Mud Cake, you need to make this twice to end up with 4 layers
250g unsalted butter, chopped
150g white chocolate, chopped coarsely
440g caster sugar
1 cup (250ml) milk
225g plain flour
75g self raising flour
1 teaspoon vanilla extract
2 eggs, lightly beaten
2 tablespoons cocoa powder
Chocolate Ganache:
250g milk chocolate, coarsely chopped
1/3 cup thickened cream
White Chocolate Ganache:
600g white chocolate, coarsely chopped
1 cup thickened cream
Yellow food colouring
Green food colouring
Decorations:
90 white mini marshmallows, halved
30 Green mini m&m's
15 yellow mini m&m's
Prepared cake board or plate
Preheat oven to slow 160C. Grease and line with baking paper base and sides of two 20cm round cake tins.
In a medium saucepan add the butter, chocolate, sugar and milk. Place over low heat, stir regularly until the butter and chocolate have melted and you have a smooth mixture, do not allow mixture to boil. Transfer to a glass mixing bowl, allow to cool slightly for 15 minutes.
Whisk the combined flours into the chocolate mixture. Whisk in the eggs and vanilla extract.
Now it helps if you have another glass bowl the same size as the one the chocolate mixture is in, as you need to divide the chocolate mixture in half (using a glass bowl of the same size makes it easier). Pour one of the chocolate mixtures into one of the prepared tins. If you don't have two identical bowls, just pour half
of the mixture into one of the prepared tins as close as you can.
In the remaining chocolate mixture sift in the cocoa, then whisk to combine. Pour into the other prepared tin.
Bake cakes for 1 hour and 10 minutes. Remove from oven, leave in the tins for 5 minutes, before placing onto a wire rack to cool, top side up.
Chocolate Ganache: In a small heatproof bowl place the chocolate and cream. Place over a saucepan of simmering water, don't let the water touch the bowl the chocolate is in. Mix until all the chocolate has melted and you have a smooth consistency. Place in the refrigerator, every 10 minutes give it a stir until it becomes a thick spreadable consistency.
White Chocolate Ganache: In a small heatproof bowl place the white chocolate and cream. Place over a saucepan of simmering water, don't let the water touch the bowl the chocolate is in. Mix until all the chocolate has melted and you have a smooth consistency. Place in the refrigerator, every 10 minutes give it a stir until it becomes a thick spreadable consistency. Don't tint the icing yet.
Once cooled, level the top of each cake, so you get a flat surface.
Place one cake on a serving plate, start with a chocolate slice. Spread a thin layer of chocolate ganache all over the cake, top with alternate coloured cake, spread with ganache, repeat alternating cakes by colour. You can do up to this step, up to 3 days before, refrigerate covered with cling film.
The white chocolate ganache is best done on the day the cake is needed, but you can do it the day before. Do not refrigerate once decorated, as m&m's 'bleed' and lose colour once refrigerated.
Before you tint the icing, spread a thin layer of icing all over the cake. Then refrigerate for 20 minutes. This will make sure all cake crumbs will be stuck to this layer of icing and will not ruin your tinted icing.
While the cake is in the refrigerator. Separate the remaining icing into two bowls, make sure you will have enough for the top in one bowl and enough for the sides in the other bowl. Tint the icing you allocated for the top yellow, add a little tint at a time, until you get the colour you are happy with. Do the same with the green tint and the quantity you allocated for the sides.
Spread the top icing on first, make sure it is relatively thick and covers the cake well.
Then spread the sides on carefully and again it will need to be a relatively thick layer to ensure a smooth finish.
While the icing is still soft, decorate with mini marshmallows and mini m&m's, use the picture as a guide. Again I don't recommend refrigerating as m&m's lose colour once refrigerated. The cake is fine iced out of the refrigerator if it is not a really hot day.
Enjoy!


